At the end of last year [I made a guide](https://blog.northwestw.in/p/2024/12/28/splatnet-3-token-mitmproxy-guide) for obtaining the SplatNet 3 token using MITMProxy because Nintendo's update broke the automatic token generation program with their "new fancy authentication system".
Guess what? They broke it again!
After the update v3.0.1 of the Nintendo Switch Online app around late May, the app no longer works on my Android emulator (and for some other people as well). Since then, [me and a bunch of others have been tackling with this issue](https://github.com/frozenpandaman/s3s/issues/198), and today, I can finally present to you a solution!
Shout out to [samuelthomas2774](https://github.com/frozenpandaman/s3s/issues/198#issuecomment-2981210614) for finding out the temporary solution. (I was so close!)
Prerequisites
This time, you'll need to following programs:
- Android Studio
- curl (or something that allows you to make POST requests)
- perl (we use this to automate text-finding)
- sqlite3 (or something that can read Sqlite 3 databases)
Creating the Android Emulator
DO NOT SKIP this part even when you have created an emulator before, especially if you followed my guide.
Right now, we know the NSO app only refuses to work on x86\_64 devices. That's why it works on your smartphone, but not on the computer. However, we do know |it works with x86 devices.| |It also requires Google Play instead of simply the Google API for some unknown reasons.|
- Launch Android Studio. Navigate to the "Welcome to Android Studio" window.
- Click the three dots in the top-right corner, and open the "Virtual Device Manager"
- Click the "+" button in the top-left corner. A window for creating an AVD should open.
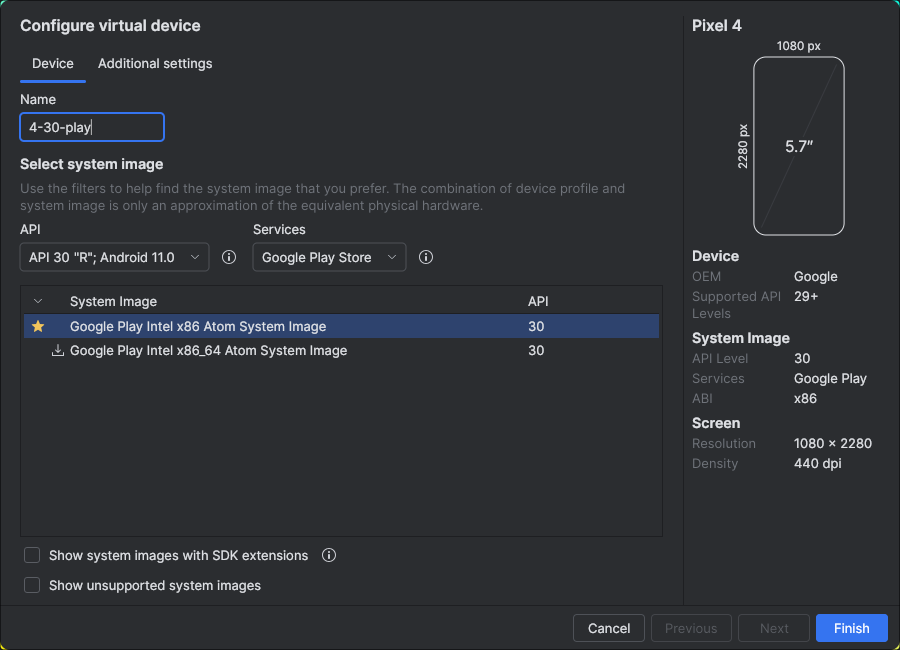
- (Important!) Select the device "Pixel 4" and click next.
- (Important!) For system image, choose "API 30 R, Android 11.0" with "Google Play Store".
- Run the emulator and keep it running.
NSO App
Next, we will install the Nintendo Switch Online app. You can use the same steps as the last guide, but we have a way to install it without the stupid APKMirror app.
- Keep the emulator running.
- Obtain the NSO app APK from APKMirror or other providers.
- Extract the ".apkm" file. If you file extractor program doesn't want to extract it directly, rename the extension to ".zip".
- Launch a terminal and `cd` into the folder where all the APKs are extracted.
- Install all the required APKs. Run `adb install-multiple base.apk split_config.{x86,en,xxhdpi}.apk`
- Login to your account.
Rooting the Emulator
This is where this guide starts to differ from the old one. Instead of using MITMProxy, |we will directly extract the tokens from the emulator's storage.| And to do that, we will need to have root access to the emulator.
The easiest way to do so right now is by [rootAVD](https://gitlab.com/newbit/rootAVD).
- Keep the emulator running.
-
Clone/Download the repository.
- If you have `git`, simply run `git clone https://gitlab.com/newbit/rootAVD`
- Otherwise, download it from GitLab by clicking on "Code" and choosing "zip"
- Using a terminal, `cd` into the cloned respository.
- Run `./rootAVD.sh ListAllAVDs` (replace `rootAVD.sh` with `rootAVD.bat` if you're using Windows). You will get a list of system images.
- Find the path of the system image you installed in the earlier steps. For me, it's "system-images/android-30/google_apis_playstore/x86/ramdisk.img".
-
Run `./rootAVD.sh <path from last step>`
- It should ask you to choose which Magisk version to use.
- At the time of writing, Magisk (stable) is at 29.0 and it seems to work well, so I just use that.
- The emulator will restart. Wait for it.
- Open Magisk on the emulator. It should ask you for additional setup. Do it. It should restart again.
- Open Magisk on the emulator again.
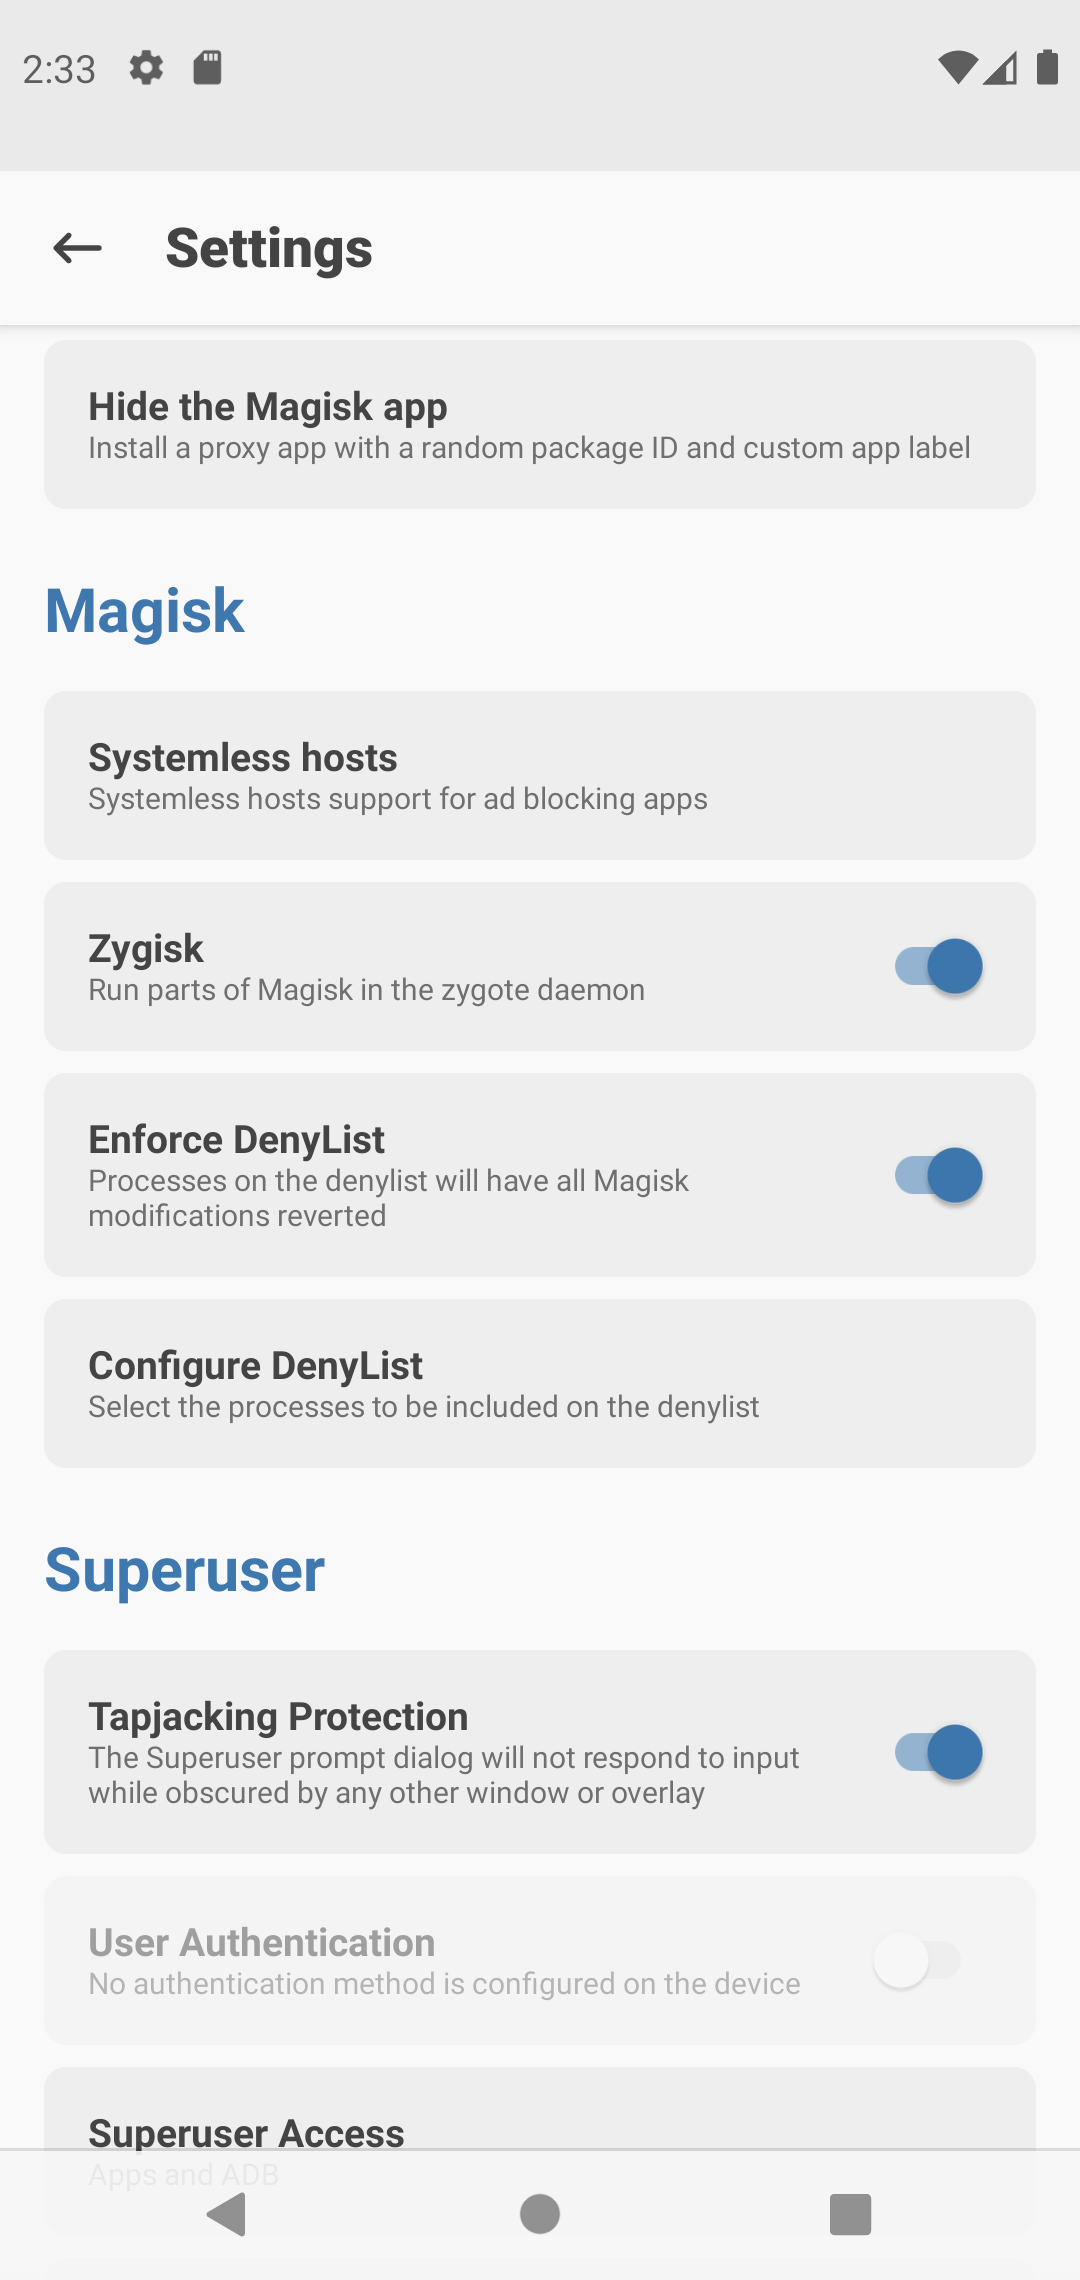
- Click on settings on the top-right corner.
- Click on "Configure Deny List" and add NSO app to it.
- Enable "Enforce Deny List".
Getting the Tokens
After all of those, we can finally obtain the tokens... With a few more steps. We are almost there. Just a little bit more.
In this part, we will directly grab the `gtoken` from the cookies cache of the NSO app. This is mainly based on [this script by imc0](https://github.com/imc0/nso-get-data).
- Keep the emulator running.
-
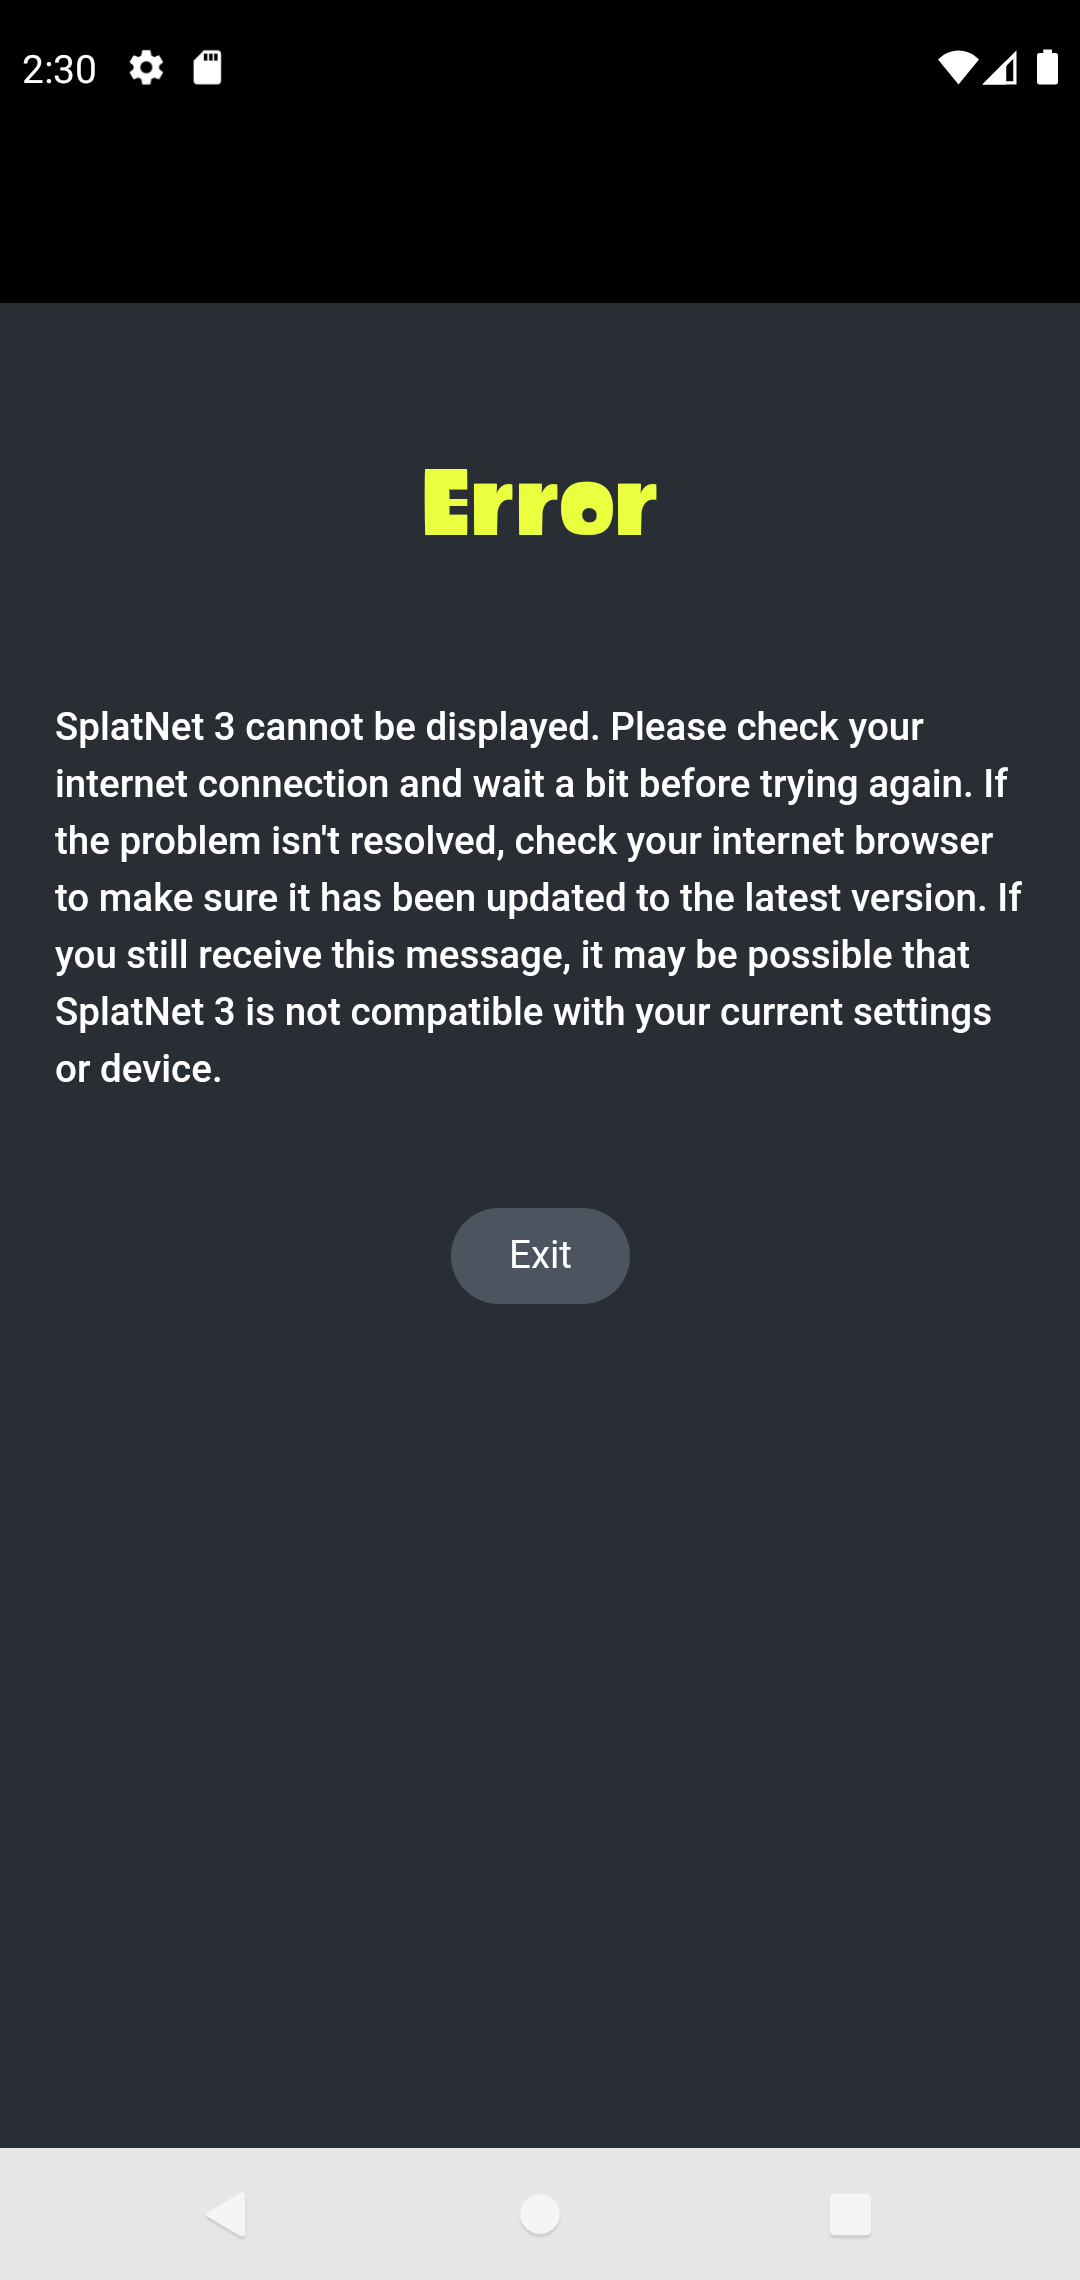
Open the NSO app and enter SplatNet 3.
- You should be greeted with an error, but in Splatoon font. This is normal.
- Fire up a terminal.
-
Run `adb shell su -c "cp
/data/user/0/com.nintendo.znca/app_webview/Default/Cookies
/storage/emulated/0/Download/"`.
- This will copy the cookies file from the data directory (root) to download (user) so we can pull it.
- Run `adb pull /storage/emulated/0/Download/Cookies` to get the Cookies from the emulator to our computer.
-
Run `sqlite3 Cookies "select value from cookies where name='\_gtoken' order by
creation_utc desc limit 1;"`
- Alternatively, you can use a Sqlite 3 database browser and get `\_gtoken` from the `cookies` table
- This will return the |gtoken|.
- We will call this string `$gtoken`.
-
Run `curl -s "https://api.lp1.av5ja.srv.nintendo.net/" \| grep -a -o
'main\\.[0-9a-f]\*\\.js'` to get the Javascript file path.
- Alternatively, you can directly go to [https://api.lp1.av5ja.srv.nintendo.net/](https://api.lp1.av5ja.srv.nintendo.net/) and find the script tag in head using devtools.
- At the time of writing, this returns |main.4bdad577.js|.
- We will call this string `$js`.
-
Run `curl -s "https://api.lp1.av5ja.srv.nintendo.net/static/js/$js" \| perl -lne
'print "$2$1" if /null===\\(..=\"([0-9a-f]{8}).{60,120}\`,..=\`([0-9.]+-)/;'`
- This command is basically `perl` magic that extracts the version of SplatNet 3.
- At the time of writing, this returns |10.0.0-88706e32|.
- We will call this string `$nsover`.
-
(Finally!) Run `curl -s -X POST -H 'Content-Type: application/json' -H
"X-Web-View-Ver: $nsover" -H 'accept-language: en-US' -H 'x-nacountry: US' -b
"\_gtoken=$gtoken" "https://api.lp1.av5ja.srv.nintendo.net/api/bullet_tokens"`
- This should return a JSON object.
- It looks like this: `{..."bulletToken":"this-is-your-token!..."...}`
After much complication, we finally have both the |gtoken and bullet token!| All that's left is to plug them right back into the |s3s| `config.txt`.
Automation
Because of how complicated this entire process is, it's better to have it automated. [imc0\'s script](https://github.com/imc0/nso-get-data) is a pretty good start for the |Getting the Tokens| part. It does require some modifications to work, which I'll leave as an exercise for the readers.
On the other hand, I have my own script that integrates into |s3s-setup|, an AUR package that I made which auto-updates |s3s|. The script is at [North-West-Wind/s3s-auto-nso.](https://github.com/North-West-Wind/s3s-auto-nso)